HTML5 and App Engine: The Epic Tag Team Take on Modern Web Apps at Scale
Ido and I had a great time doing this session at IO. The video will be posted shortly, but in the meantime, here is a little walkthrough.
Slides: http://ido-green.appspot.com
Code: https://github.com/greenido/backbone-bira
Video: http://www.youtube.com/watch?v=v9TG7OzsZqQ
Pre-reqs
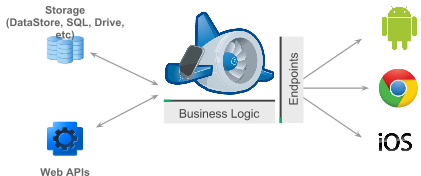
User Experiences demands are pushing modern web apps to a more distributed architecture. A pattern many developers have used is using a MVC framework on the client and communicate to the server with REST.
Google App Engine’s easy to build, easy to manage environment makes it ideal for REST APIs for Web backends. At Google IO 2012, we made it much easier to build REST APIs on App Engine with Cloud Endpoints.

Cloud Endpoints enables you to build REST and RPC APIs in App Engine. It leverages the same infrastructure Google uses for its own API and as such, you get strongly typed clients for Android, and IOS as well as a lightweight client for JavaScript which we will be walking through in this presentation.
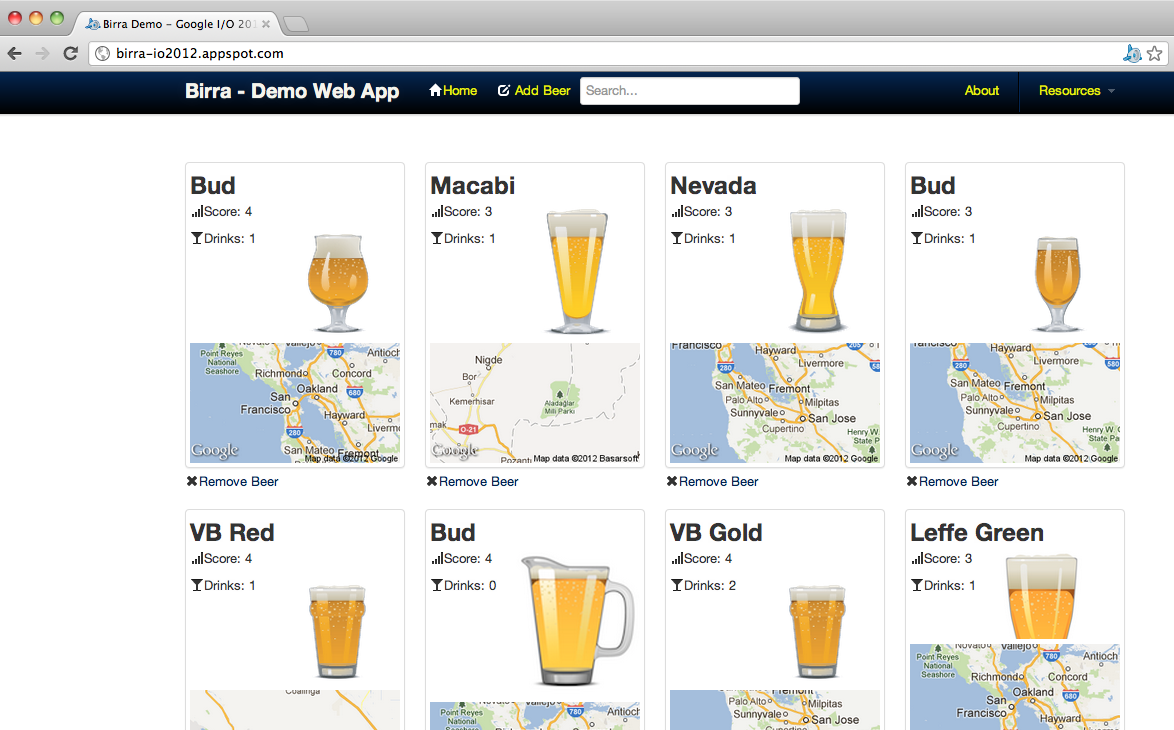
In getting ready for IO, Ido and I thought we’d build a modern web application using Cloud Endpoints. We decided on a topic that would be relevant to both App Engine and the general web developer community, something we both have some interest in and something generally useful.... a Beer rating and review web application.
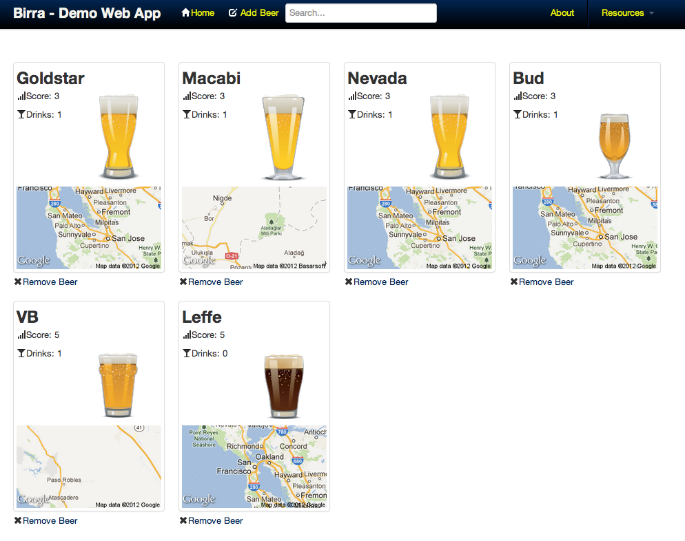
Try it out yourself at: http://birra-io2012.appspot.com/
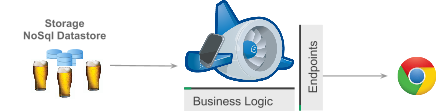
The general architecture of the app is very basic. We are storing beer metadata in the data store, doing some application logic on the app engine app, then exposing a REST based interface to a web client.
It’s not an easy definition since web technology is running very fast. Nevertheless, we can find certain features across successful web apps:
- Self Contained & Functional - They all have one specific goal and they do their best to provide the users the functionality to get to her goal. Few examples:
- New York Times – Consume news.
- Hipmunk – Find a flight that is the ‘perfect’ for your needs.
- Gojee – Find the recipe you would taste and say WOW after it.
- “Offline first” – You will want your web app to work offline. It’s an important feature that will let your users be productive on places like: planes, subways etc’. Another very important benefit will be the improve in performance. Since the app will work locally (first) and then sync the state/data the users will get responsiveness that are far better from an app that need to ‘wait’ for network on every action that the user does.
- Client Side Architecture – Since we are moving big parts of our ‘logic’ to the client we need to think about methods that will keep your code readable and maintainable. I guess this is the main reason why we see so many MVC Frameworks. The only advice we can give here is to try few of the popular ones and see how they approach the separation between the data and the UI. If you have some time go over The Top 10 Javascript MVC Frameworks Reviewed . Then, after you try ‘some’ you will be able to pick the one that fit the bill in the best way. For the busy developer (I know… most of us don’t have too much free time – Go and play with these three MVC:
- Ember.js – Don’t waste time making trivial choices
- Angular.js -Lets you extend HTML vocabulary for your application
- Backbone.js – gives structure to web applications by providing models with binding, collections and views.
- Device Aware – We all know that mobile is going ‘up and right’. So when you design your web app you should think on progressive enhancement and how it will fit to different screen sizes. Good examples to look at are: Gmail, Google plus etc’. If you want to go deeper on this interesting subject there is a webcast on ‘mobile web apps’ I did with Oreilly three weeks ago.
Let’s take a look at what it takes to build this application.
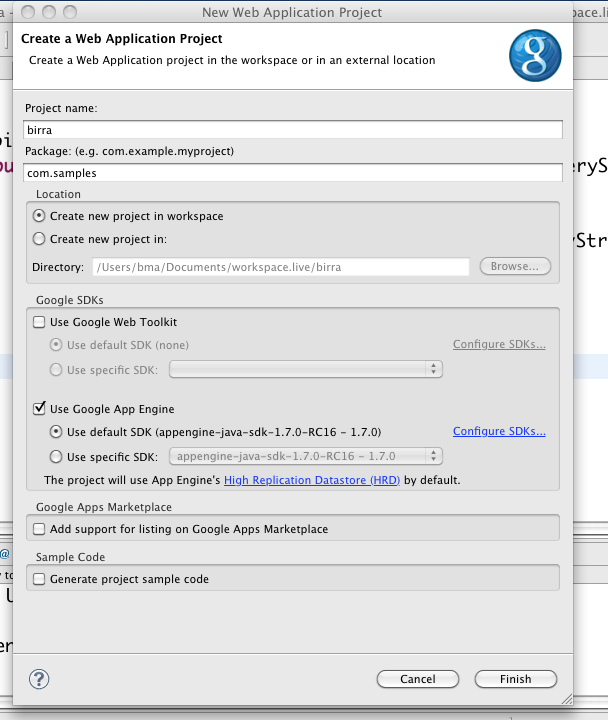
I have Eclipse and the latest version of the Google Plugin for Eclipse installed. We create a new Web Application, call it birra.
Then, if we are going to build a Beer rating app... the first thing we are going to need is... beer!
Let’s create a Beer class.
It is just a standard POJO for storing information about a beer..
public class Beer {
private Long id ;
private String beerName ;
private String kindOfBeer ;
private Long score ;
private Long numberOfDrinks ;
private Text image ;
private String country ;
private String description ;
private Double latitude ;
private Double longitude ;
public Long getId () {
return id ;
}
public void setId ( Long id ) {
this . id = id ;
}
public String getBeerName () {
return beerName ;
}
public void setBeerName ( String beerName ) {
this . beerName = beerName ;
}
public String getKindOfBeer () {
return kindOfBeer ;
}
public void setKindOfBeer ( String kindOfBeer ) {
this . kindOfBeer = kindOfBeer ;
}
public Long getScore () {
return score ;
}
public void setScore ( Long score ) {
this . score = score ;
}
public Long getNumberOfDrinks () {
return numberOfDrinks ;
}
public void setNumberOfDrinks ( Long numberOfDrinks ) {
this . numberOfDrinks = numberOfDrinks ;
}
public Text getImage () {
return image ;
}
public void setImage ( Text image ) {
this . image = image ;
}
public String getCountry () {
return country ;
}
public void setCountry ( String country ) {
this . country = country ;
}
public String getDescription () {
return description ;
}
public void setDescription ( String description ) {
this . description = description ;
}
public Double getLatitude () {
return latitude ;
}
public void setLatitude ( Double latitude ) {
this . latitude = latitude ;
}
public Double getLongitude () {
return longitude ;
}
public void setLongitude ( Double longitude ) {
this . longitude = longitude ;
}
}
Ok, that is a great Beer -- now we want to teach App Engine how to persist instances of this beer class in the datastore. To do that, we will use the classic Java JDO support. You can of course use any persistence layer (or roll your own) with Cloud Endpoints.
import javax.jdo.annotations.IdGeneratorStrategy ;
import javax.jdo.annotations.IdentityType ;
import javax.jdo.annotations.PersistenceCapable ;
import javax.jdo.annotations.Persistent ;
import javax.jdo.annotations.PrimaryKey ;
@PersistenceCapable ( identityType = IdentityType. APPLICATION )
public class Beer {
@PrimaryKey
@Persistent ( valueStrategy = IdGeneratorStrategy. IDENTITY )
private Long id ;
Now we need to expose these Beers to the JavaScript client. To do that, we need to use the new cloud Endpoints feature.
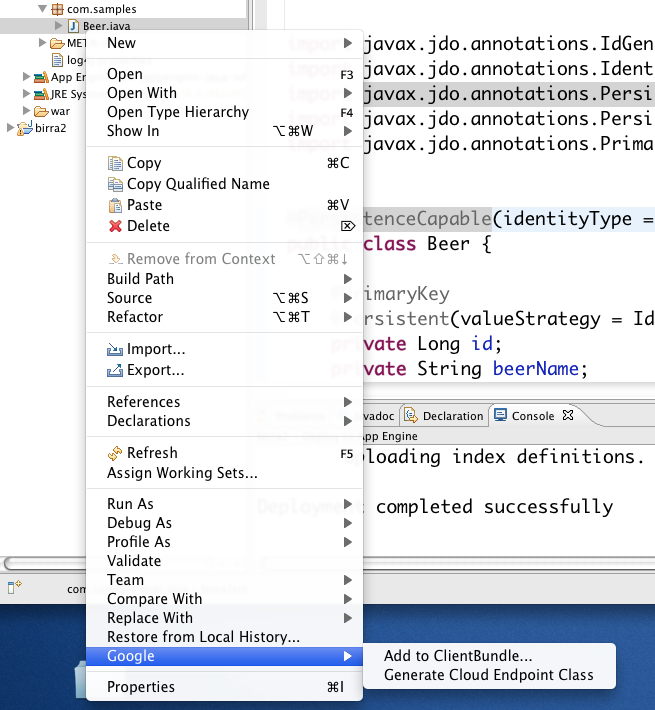
That creates a template class that does the basic List, Add, Update, and Delete operations. The code is meant to be a starter that you can modify to add your application logic.
-
@Api
(
name
=
"birra"
)
In line 1 above we use the @Api attribute. This attribute tells App Engine to expose this class as a REST\RPC endpoints. Be aware that all the public methods on this class will be accessible via REST endpoint.
I have also changed the name to birra to match with the rest of the application. We will later see this name show up the REST URL.
- public class BeerEndpoint {
- /**
- * This method lists all the entities inserted in datastore.
- * It uses HTTP GET method.
- *
- * @return List of all entities persisted.
- */
- @SuppressWarnings ({ "cast" , "unchecked" })
- public List < Beer > listBeer () {
- PersistenceManager mgr = getPersistenceManager () ;
- List < Beer > result = null ;
- try {
- Query query = mgr. newQuery ( Beer. class ) ;
- result = ( List < Beer > ) query. execute () ;
- // Tight loop for fetching all entities from datastore and accommodate
- // for lazy fetch.
- for ( Beer beer : result ) ;
- } finally {
- mgr. close () ;
- }
- return result ;
-
}
In 2-24, GPE has defined a basic list function. It simply returns all the Beers in the datastore. This method will be exposed as a http GET on method
- /**
- * This method gets the entity having primary key id. It uses HTTP GET method.
- *
- * @param id the primary key of the java bean.
- * @return The entity with primary key id.
- */
- public Beer getBeer ( @Named ( "id" ) Long id ) {
- PersistenceManager mgr = getPersistenceManager () ;
- Beer beer = null ;
- try {
- beer = mgr. getObjectById ( Beer. class , id ) ;
- } finally {
- mgr. close () ;
- }
- return beer ;
- }
-
In the above section, GPE has given us a basic get method. Given an ID for a beer, it will return the full beer instance. It is exposed as an HTTP GET.. for example beer/42
- /**
- * This inserts the entity into App Engine datastore.
- * It uses HTTP POST method.
- *
- * @param beer the entity to be inserted.
- * @return The inserted entity.
- */
- public Beer insertBeer ( Beer beer ) {
- PersistenceManager mgr = getPersistenceManager () ;
- try {
- mgr. makePersistent ( beer ) ;
- } finally {
- mgr. close () ;
- }
- return beer ;
- }
In the above section, GPE has given us a basic insert method. It takes the Beer and stores it in the datastore, which gives it an ID, then we return it back to the client. It is exposed as an HTTP POST.
- /**
- * This method is used for updating a entity.
- * It uses HTTP PUT method.
- *
- * @param beer the entity to be updated.
- * @return The updated entity.
- */
- public Beer updateBeer ( Beer beer ) {
- PersistenceManager mgr = getPersistenceManager () ;
- try {
- mgr. makePersistent ( beer ) ;
- } finally {
- mgr. close () ;
- }
- return beer ;
- }
-
In the above section, GPE has given us a basic update method. It takes the Beer updates it in the database. It is exposed as an HTTP PUT.
- /**
- * This method removes the entity with primary key id.
- * It uses HTTP DELETE method.
- *
- * @param id the primary key of the entity to be deleted.
- * @return The deleted entity.
- */
- public Beer removeBeer ( @Named ( "id" ) Long id ) {
- PersistenceManager mgr = getPersistenceManager () ;
- Beer beer = null ;
- try {
- beer = mgr. getObjectById ( Beer. class , id ) ;
- mgr. deletePersistent ( beer ) ;
- } finally {
- mgr. close () ;
- }
- return beer ;
- }
-
In the above section, GPE has given us a basic delete method. It takes an ID of a beer and removes it from database. It is exposed as an HTTP DELETE.
- private static PersistenceManager getPersistenceManager () {
- return PMF. get () . getPersistenceManager () ;
- }
- }
Let’s test this locally with curl to ensure it is working well before we start to build out a our web client. First we start the local development time server by hitting debug.
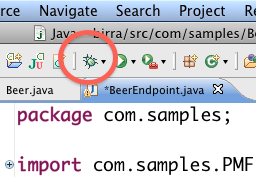
Now we see our local development time server up and running. From there we also get hint as to the right URL to use for curl.

% curl http://localhost:8888/_ah/api/birra/v1/beer
{
"items" : [ ]
}
Above you can see we are hitting our local development time server. Then we use the _ah namespace which is the standard app engine reserved namespace... this ensures there are not conflicts with any web pages in your app. The we use the /api/birra path. “birra” comes from the @Api() attribute at the top of the BeerEndpoints.java file. Then we access the beer endpoint. This comes from the name of the type the List method returns.
The results is an empty list encoded as JSON. Let’s look at how we add an item.
% curl -H 'Content-Type: appilcation/json' -d '{"beerName": "bud"}' http://localhost:8888/_ah/api/birra/v1/beer
{
"id" : 1,
"beerName" : "bud",
"kindOfBeer" : null,
"score" : null,
"numberOfDrinks" : null,
"image" : null,
"country" : null,
"description" : null,
"latitude" : null,
"longitude" : null
}
Above you can see we are doing an HTTP POST passing a json encoded blob where we set the beerName to bud. The results is a JSON blob of the beer after it has been added to the datastore. Notice it has an ID set which we can use to query for it later.
% curl http://localhost:8888/_ah/api/birra/v1/beer/1
{
"id" : 1,
"beerName" : "bud",
"kindOfBeer" : null,
"score" : null,
"numberOfDrinks" : null,
"image" : null,
"country" : null,
"description" : null,
"latitude" : null,
"longitude" : null
}
The above code calls the getBeer method passing beerId of 1 and this returns a JSON blob of the beer.
As we will see later, we can use the Google API JavaScript client library to access our methods. To control what they look like in the JavaScript code, we can use the @Api attribute in the com.google.api.server.spi.config.ApiMethod package. We will look a fair bit at the customization options this attribute gives us later in the post.
@ApiMethod ( name = "beers.delete" )
public Beer removeBeer ( @Named ( "id" ) Long id ) {
That is great that we can do this level of testing on the client, but let’s take a look at a version of this I deployed earlier. You can get a list of all the APIs on your app engine app by hitting:
https://<appid>.appspot.com/_ah/api/discovery/v1/apis
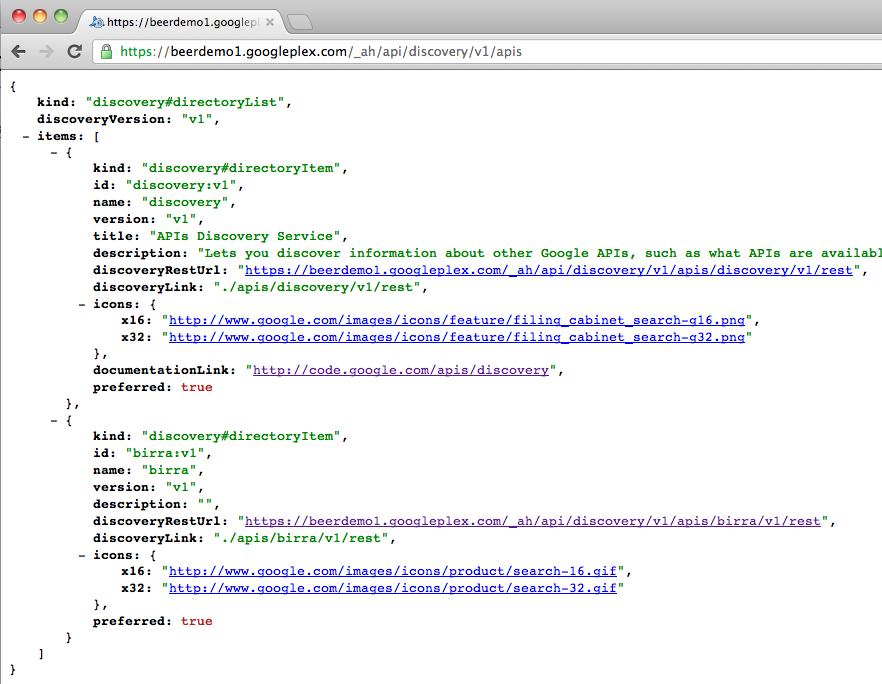
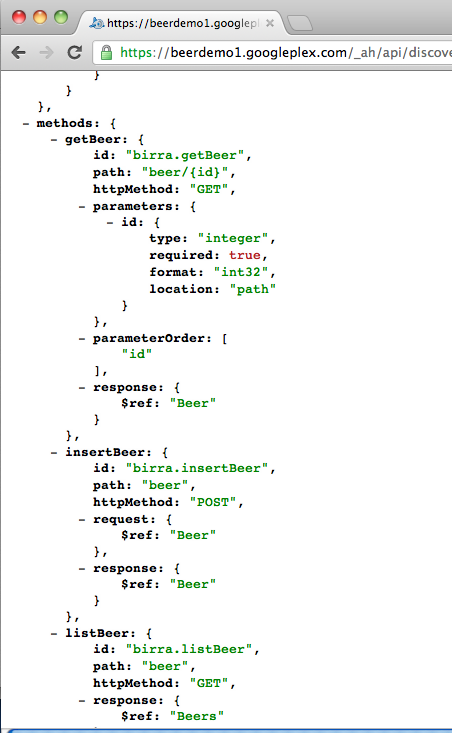
Above you can see that discovery is tell us we have two APIs. The top one is the discovery API itself and the bottom one is the birra API we just created. Clicking on the discoveryRestUrl link we see the discovery doc for our API. This is the exact same discovery doc format we use for most Google APIs and as such works with our Google Client Libraries.
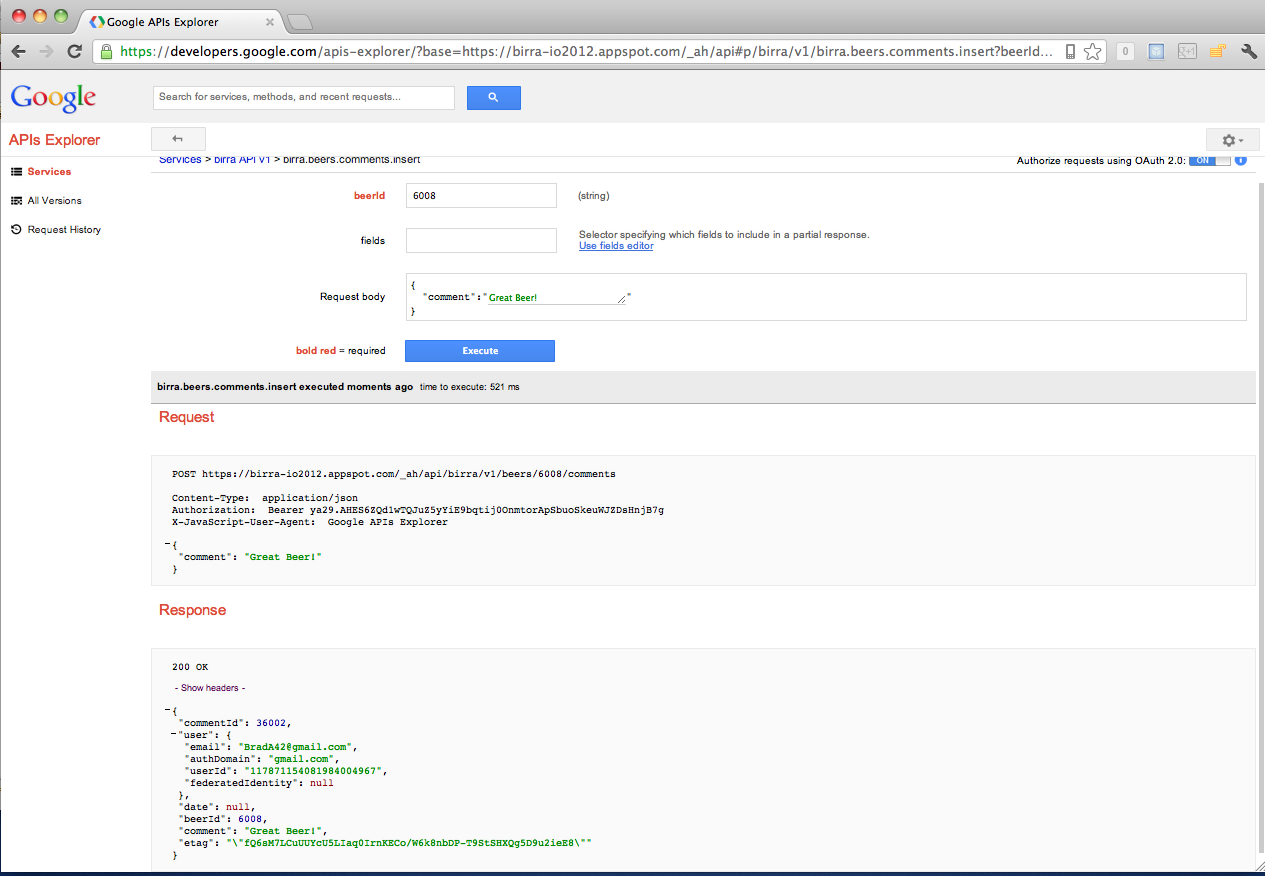
In addition, we can use the Google API Explorer with our custom API. It is very easy to get to by using the explorer shortcut. http://<appid>.appspot.com/_ah/api/explorer
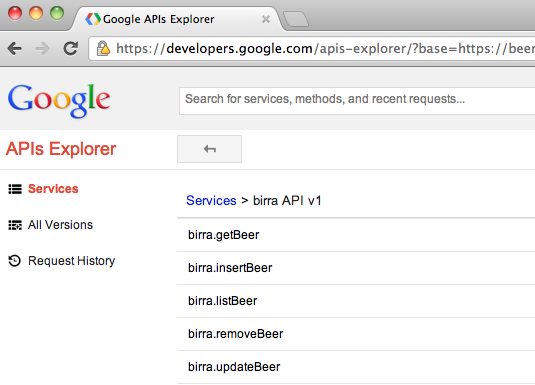
Above we see a list of all the methods we defined in our API. Clicking on any of them allows me to interact with that method live.
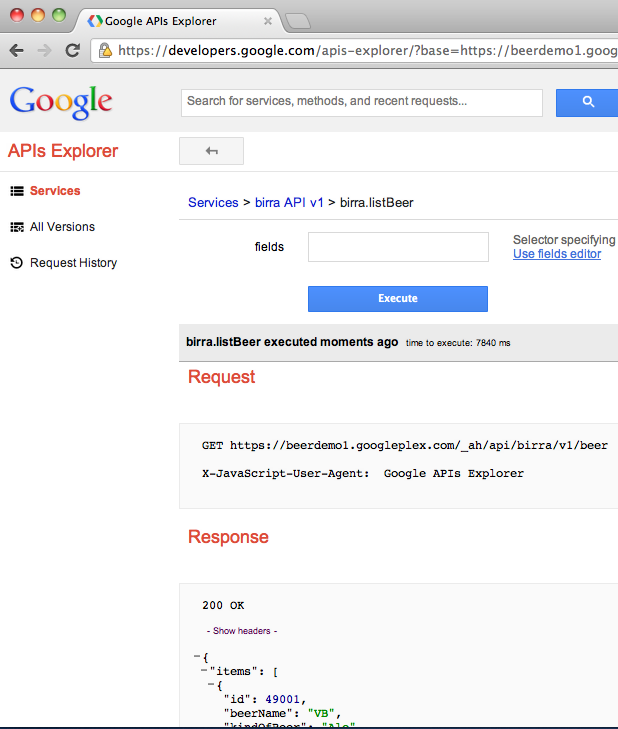
Notice that we see the exact http request and the response. This is a very nice way to debug the API independently from the client. It also gives you all the insight into request and response formats to help you build out great clients.
Now, let’s take a look at using this API from JavaScript..
Client side code to get a list of beers
As we all know, in software development it’s good to take small steps. So first thing we will try to do is to run a simple ajax request.
var apiUrl = "https://birra-io2012.appspot.com/_ah/api/birra/v1/beer";
$.ajax({
url: apiUrl,
dataType: 'json',
contentType: 'application/json',
type: "GET",
success: function(data) {
showList(data);
},
error: function(xhr, ajaxOptions, thrownError) {
console.error("Beer list error: " + xhr.status);
}
});
You can try this generic test page from : https://github.com/greenido/backbone-bira/blob/master/test-page/index_ini_1.html
or test it live:
http://birra-io2012.appspot.com/test /
After we were successful in getting the list of beers with plain vanilla JavaScript, it’s time to use google api JavaScript library. Why? Well, you are getting some powerful features like:
- RPC Batch
- CORS
- Authentication out of the box
- Version control
- Super Simple to use.
- Generic
The call to get the JS library:
<script src="https://apis.google.com/js/client.js?onload=loadGapi">
{ "client": {},
"googleapis.config": {
root: "https://birra-io2012.appspot.com/_ah/api"
}
}
</script>
The callback that will be called after Google API JS library was loaded. In our case, we wish to set the API key and load our amazing beer service: ‘birra’.
function loadGapi() {
// Set the API key
gapi.client.setApiKey('AIzaSyD_mrsCOGa_cip-_O9YzmruYQ831uQcqPE');
// Set: name of service, version and callback function
gapi.client.load('birra', 'v1', getBeers);
}
The callback function that will be called after our Birra service was loaded. In this case we fetch a list of beers (top 20 beers) and show them to the user.
function getBeers() {
var req = gapi.client.birra.listBeer();
req.execute(function(data) {
showList(data);
});
}
Here are some of the basic Adding, Editing and Removing operations:
<<GI TODO >>
Let’s take a look at adding Comment support to this application. I may want to allow people to leave comments on the beers. To do that, let’s add a new Comment class and enable it for persistence into the datastore.
@PersistenceCapable ( identityType = IdentityType. APPLICATION )
public class Comment {
@PrimaryKey
@Persistent ( valueStrategy = IdGeneratorStrategy. IDENTITY )
private Long commentId ;
private User user ;
private String date ;
private Long beerId ;
private String comment ;
public Long getCommentId () {
return commentId ;
}
public void setCommentId ( Long commentId ) {
this . commentId = commentId ;
}
public User getUser () {
return user ;
}
public void setUser ( User user ) {
this . user = user ;
}
public String getDate () {
return date ;
}
public void setDate ( String date ) {
this . date = date ;
}
public Long getBeerId () {
return beerId ;
}
public void setBeerId ( Long beerId ) {
this . beerId = beerId ;
}
public String getComment () {
return comment ;
}
public void setComment ( String comment ) {
this . comment = comment ;
}
}
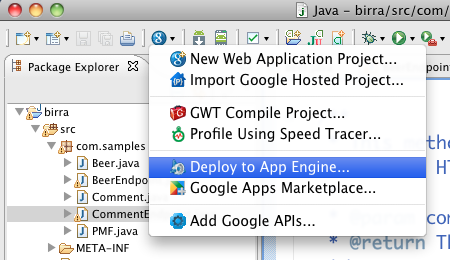
Now, we need to expose Comment as part of our Birra REST API. We use the Google->Generate Cloud Endpoint class option in eclipse.
We change the name to be birra to have it be part of the same API.
@Api ( name = "birra" )
public class CommentEndpoint {
Then for listComment() method, notice it is returning all the comments, but that is unlikely to be what we want on the client. We likely want to return just the comments on a giving Beer. To do that, we need to pass a BeerId in.
Notice we customize the path to make it very intuitive to use as a REST interface. We also customize query for comments, to only get those with a particular beer ID
@ApiMethod ( name = "beers.comments.list" ,
path = "beers/{beerId}/comments" )
public List < Comment > listComment ( @Named ( "beerId" ) Long beerId ) {
PersistenceManager mgr = getPersistenceManager () ;
List < Comment > result = null ;
try {
Query query = mgr. newQuery ( Comment. class , "beerId == " + beerId ) ;
result = ( List < Comment > ) query. execute ()
We use the same sort of syntax all the methods on comment...
@ApiMethod ( name = "beers.comments.get" ,
path = "beers/{beerId}/comments/{id}" )
public Comment getComment ( @Named ( "beerId" ) Long beerId, @Named ( "id" ) Long id ) {
@ApiMethod ( name = "beers.comments.insert" ,
path = "beers/{beerId}/comments" )
public Comment insertComment ( @Named ( "beerId" ) Long beerId, Comment comment ) {
comment. setBeerId ( beerId ) ;
Now, let’s take a look at the curl syntax for calling this method.
Here we do a HTTP GET for all the comments on Beer with the ID 1.
% curl http://localhost:8888/_ah/api/birra/v1/beers/1/comments
{
"items" : [ ]
}
There are none there, so let’s add one.
% curl -H 'Content-Type: appilcation/json' -d '{"comment": "nice head"}' http://localhost:8888/_ah/api/birra/v1/beers/1/comments
{
"commentId" : 2,
"user" : null,
"date" : null,
"beerId" : 1,
"comment" : "nice head"
}%
Adding / Getting Comments from the client
This is the function that we will call when we wish to add a new comment to a specific beer.
Please note to the feature object that contain all our information for a new comment.
$("#saveCommentsBeer").click(function() {
var features = {};
var tmpDate = new Date();
tmpDate = tmpDate.format("mmm d yyyy h:MTT");
// We wish to know when the user add a specific comment.
features['date'] = tmpDate;
// Here is the comment. In a real world - we wish to validate its
// content and make sure it’s clean (e.g. just text and nothing else).
features['comment'] = $("#beerComment").val();
// Some more ‘meta’ data on the comment.
// For example: user name, email etc’
$("#beerCommentsModal input[id^='beer']").each(function() {
features[$(this).attr('name')] = $(this).val();
});
var req = gapi.client.birra.beers.comments.insert(features);
req.execute(function(data) {
var tmpHTML;
// first thing we wish to do is to show the user that we got an answer
// from the server. So we will remove the spinner from the screen.
$("#spinner").remove();
if (data.error && data.error.code > 200) {
console.error("Err Code: " + data.error.code + " Err: " + data.error.message);
tmpHTML = data.error.message;
}
else {
tmpHTML = '<h4>Your great comment on beer ' + data.beerId + ' is Safe</h4>';
tmpHTML += "<img src='img/beer-icon-36.png'/>"
}
$('#results').html("");
$('#alertContent').html(tmpHTML);
$('.alert').show();
});
// Closing our ‘add comment’ dialog.
$('#beerCommentsModal').modal('hide');
});
In order to get a comment from the server we need to pass a beerId and the server will fetch us all the comments that are associated with it. Here we listen to a click on a button ‘beerComments’ that will fetch the comments per beer.
$("#beerComments").click(function() {
var req = gapi.client.birra.beers.comments.list({
'beerId': $("#gbeerId").val() // our current beerId
});
req.execute(function(data) {
beerApp.showComments(data);
});
})
Paging
Now let’s look at how to add paging. Today our listBeer() method returns all the beers in the datastore. That is fine for a demo, but we expect this app to be widely successful with 100s of thousands of beers. To prepare for that, we need to add paging support to listBeer() and show off a few more Endpoints features.
- @ApiMethod ( name = "beers.list" , path = "beer" )
- public CollectionResponse < Beer > listBeers ( @Nullable @Named ( "cursor" ) String cursorString,
- @Nullable @Named ( "limit" ) Integer limit ) {
Above, you see we now have two params. The limit tells us how many beers to return and the cursorString tells us where to pick on iterating through the list using query cursors.
- PersistenceManager mgr = null ;
- Cursor cursor = null ;
- List < Beer > execute = null ;
- try {
- mgr = getPersistenceManager () ;
- Query query = mgr. newQuery ( Beer. class ) ;
- if ( cursorString != null && cursorString != "" ) {
- cursor = Cursor . fromWebSafeString ( cursorString ) ;
- Map < String , Object > extensionMap = new HashMap < String , Object > () ;
- extensionMap. put ( JDOCursorHelper. CURSOR_EXTENSION , cursor ) ;
-
query.
setExtensions
(
extensionMap
)
;
Above we are setting the cursor that was sent in from the client
- }
- if ( limit != null ) {
- query. setRange ( 0 , limit ) ;
- }
Above, if the limit is passed it, we set it in our query..
- execute = ( List < Beer > ) query. execute () ;
- cursor = JDOCursorHelper. getCursor ( execute ) ;
- if ( cursor != null ) cursorString = cursor. toWebSafeString () ;
- else cursorString = "" ;
- // Tight loop for fetching all entities from datastore and accomodate
- // for lazy fetch.
- for ( Beer e : execute ) ;
- } finally {
- mgr. close () ;
- }
- return CollectionResponse. < Beer > builder ()
- . setItems ( execute )
- . setNextPageToken ( cursorString )
- . build () ;
- }
Above we return the results to the client which include all the beers we retrieved and the cursor that indicates where to start from for the next query..
OK, to test this out, let’s add in two more beers.
% curl -H 'Content-Type: appilcation/json' -d '{"beerName": "Moms Home brew"}' http://localhost:8888/_ah/api/birra/v1/beer
{
"id" : 3,
"beerName" : "Moms Home brew",
"kindOfBeer" : null,
"score" : null,
"numberOfDrinks" : null,
"image" : null,
"country" : null,
"description" : null,
"latitude" : null,
"longitude" : null
}% curl -H 'Content-Type: appilcation/json' -d '{"beerName": "Bobs Indian Pale Ale"}' http:/localhost:8888/_ah/api/birra/v1/beer
{
"id" : 4,
"beerName" : "Bobs Indian Pale Ale",
"kindOfBeer" : null,
"score" : null,
"numberOfDrinks" : null,
"image" : null,
"country" : null,
"description" : null,
"latitude" : null,
"longitude" : null
}%
Now when we list, we get all three beers.
% curl http://localhost:8888/_ah/api/birra/v1/beer{
"items" : [ {
"id" : 1,
"beerName" : "bud",
"kindOfBeer" : null,
"score" : null,
"numberOfDrinks" : null,
"image" : null,
"country" : null,
"description" : null,
"latitude" : null,
"longitude" : null
}, {
"id" : 3,
"beerName" : "Bobs Indian Pale Ale",
"kindOfBeer" : null,
"score" : null,
"numberOfDrinks" : null,
"image" : null,
"country" : null,
"description" : null,
"latitude" : null,
"longitude" : null
} ],
"nextPageToken" : ""
}
Notice, we are returning a nextPageToken, but it is empty because default we are returning all the beers.
Now, we’ll try our limit parameter... It is optional, so it is passed in via a query string.
% curl http://localhost:8888/_ah/api/birra/v1/beer?limit=1
{
"items" : [ {
"id" : 1,
"beerName" : "bud",
"kindOfBeer" : null,
"score" : null,
"numberOfDrinks" : null,
"image" : null,
"country" : null,
"description" : null,
"latitude" : null,
"longitude" : null
} ],
"nextPageToken" : "E-ABAIICF2oJbm9fYXBwX2lkcgoLEgRCZWVyGAEMFA"
}
Notice we have a nextPageToken, let’s use that to iterate through and find the next beer.
% curl 'http://localhost:8888/_ah/api/birra/v1/beer?limit=1&cursor=E-ABAIICF2oJbm9fYXBwX2lkcoLEgRCZWVyGAEMFA'
{
"items" : [ {
"id" : 2,
"beerName" : "Moms Home brew",
"kindOfBeer" : null,
"score" : null,
"numberOfDrinks" : null,
"image" : null,
"country" : null,
"description" : null,
"latitude" : null,
"longitude" : null
} ],
"nextPageToken" : "E-ABAIICF2oJbm9fYXBwX2lkcgoLEgRCZWVyGAIMFA"
}
Great! It is now pretty easy to build out a JavaScript client for this..
Pagination from the Client
In the client ‘life is good’. All we need to implement in order to show off our friend our ability to have pagination is to add to our calls for beer.list with the new parameter: nextPageToken
Once we got in the response a nextPageToken we will store it in beerApp.cursor
So next time we are calling the list we have its value and the server will fetch us a new set of beers that are align after this mark.
$('#results').html(beerApp.callingServerHtml);
var req = gapi.client.birra.beers.list({
'cursor': beerApp.cursor
});
req.execute(function(data) {
beerApp.showList(data);
});
you can see in our example how in case we have a value in nextPageToken we add a new button to the UI ‘More’ so the user will know she can move to the next page.
This is the test page : https://github.com/greenido/backbone-bira/blob/master/test-page/index.html
and it’s JavaScript code:
https://github.com/greenido/backbone-bira/blob/master/test-page/js/scripts-gapi.js
or test it live at:
http://birra-io2012.appspot.com/test/
Search
Now let’s take a look at adding Search to our app. We are levearging the power of the underlying infrastructure for google’s own search product.
The first thing we need to do is setup an index.
private static final Index INDEX = getIndex () ;
private static Index getIndex () {
IndexSpec indexSpec = IndexSpec. newBuilder ()
. setName ( "beerindex" )
. setConsistency ( Consistency. PER_DOCUMENT )
. build () ;
return SearchServiceFactory. getSearchService () . getIndex ( indexSpec ) ;
}
Now, we need to add beers to that index. With this code we can customize exactly which fields from the Beer get indexed. Notice as well we are including type information (String or Number) this is used by the query processor to enable some advanced queries we will look at later.
private static void addBeerToSearchIndex ( Beer b ) {
Document . Builder docBuilder = Document . newBuilder ()
. addField ( Field . newBuilder () . setName ( "name" )
. setText ( b. getBeerName () != null ? b. getBeerName () : "" ))
. addField ( Field . newBuilder () . setName ( "id" )
. setText ( Long . toString ( b. getId ())))
. addField ( Field . newBuilder () . setName ( "country" )
. setText ( b. getCountry () != null ? b. getCountry () : "" ))
. addField ( Field . newBuilder () . setName ( "kind" )
. setText ( b. getKindOfBeer () != null ? b. getKindOfBeer () : "" ))
. addField ( Field . newBuilder () . setName ( "latitude" )
. setNumber ( b. getLatitude () != null ? b. getLatitude () : 0 ))
. addField ( Field . newBuilder () . setName ( "longitude" )
. setNumber ( b. getLongitude () != null ? b. getLongitude () : 0 ))
. addField ( Field . newBuilder () . setName ( "description" )
. setText ( b. getDescription () != null ? b. getDescription () : "" ))
. addField ( Field . newBuilder () . setName ( "score" )
. setNumber ( b. getScore () != null ? b. getScore () : 0 ))
. addField ( Field . newBuilder () . setName ( "numberOfDrinks" )
. setNumber ( b. getNumberOfDrinks () != null ? b. getNumberOfDrinks () : 0 ))
. addField ( Field . newBuilder () . setName ( "published" )
. setDate ( Field . date ( new Date ()))) ;
docBuilder. setId ( Long . toString ( b. getId ())) ;
Document doc = docBuilder. build () ;
INDEX. add ( doc ) ;
}
Then we simply call addBeerToSearchIndex() from insertBeer() and updateBeer(). In delete, we need to remove the beer from the index.
public Beer insertBeer ( Beer beer ) {
PersistenceManager mgr = getPersistenceManager () ;
try {
mgr. makePersistent ( beer ) ;
} finally {
mgr. close () ;
}
addBeerToSearchIndex ( beer ) ;
return beer ;
}
public Beer updateBeer ( Beer beer ) {
PersistenceManager mgr = getPersistenceManager () ;
try {
mgr. makePersistent ( beer ) ;
} finally {
mgr. close () ;
}
addBeerToSearchIndex ( beer ) ;
return beer ;
}
public Beer removeBeer ( @Named ( "id" ) Long id ) {
PersistenceManager mgr = getPersistenceManager () ;
Beer beer = null ;
try {
beer = mgr. getObjectById ( Beer. class , id ) ;
mgr. deletePersistent ( beer ) ;
} finally {
mgr. close () ;
}
INDEX. remove ( beer. getId () . toString ()) ;
return beer ;
}
Now, we have a beers in the index, we need to expose a way for search. For that we will add a new Endpoint for search. Notice we are customizing the HTTP method here as well as the name and path.
@ApiMethod ( httpMethod = "GET" , name = "beer.search" )
public List < Beer > searchBeer ( @Named ( "term" ) String queryString ) {
List < Beer > beerList = new ArrayList < Beer > () ;
Results < ScoredDocument > results = INDEX. search ( queryString ) ;
for ( ScoredDocument scoredDoc : results ) {
Field f = scoredDoc. getOnlyField ( "id" ) ;
if ( f == null || f. getText () == null ) continue ;
long beerId = Long . parseLong ( f. getText ()) ;
if ( beerId != - 1 ) {
Beer b = getBeer ( beerId ) ;
beerList. add ( b ) ;
}
}
return beerList ;
}
Now we can test that out. As we add items we see the search engine spin up.
% curl -H 'Content-Type: appilcation/json' -d '{"description": "cool beer"}' http://localhst:8888/_ah/api/birra/v1/beer
{
"id" : 5,
"beerName" : null,
"kindOfBeer" : null,
"score" : null,
"numberOfDrinks" : null,
"image" : null,
"country" : null,
"description" : "cool beer",
"latitude" : null,
"longitude" : null
}
Now we can search for that beer and we get it.
% curl http://localhost:8888/_ah/api/birra/v1/searchBeer/cool
{
"items" : [ {
"id" : 4,
"beerName" : null,
"kindOfBeer" : null,
"score" : null,
"numberOfDrinks" : null,
"image" : null,
"country" : null,
"description" : "cool beer",
"latitude" : null,
"longitude" : null
} ]
}
For more fun, let’s add a few beers with different scores.
% curl -H 'Content-Type: appilcation/json' -d '{"score": "10"}' http://localhost:8888/_ah/api/birra/v1/beer
{
"id" : 1,
"beerName" : null,
"kindOfBeer" : null,
"score" : 10,
"numberOfDrinks" : null,
"image" : null,
"country" : null,
"description" : null,
"latitude" : null,
"longitude" : null
}
% curl -H 'Content-Type: appilcation/json' -d '{"score": "9"}' http://localhost:8888/_ah/ap/birra/v1/beer
{
"id" : 2,
"beerName" : null,
"kindOfBeer" : null,
"score" : 9,
"numberOfDrinks" : null,
"image" : null,
"country" : null,
"description" : null,
"latitude" : null,
"longitude" : null
}
% curl -H 'Content-Type: appilcation/json' -d '{"score": "11"}' http://localhost:8888/_ah/ai/birra/v1/beer
{
"id" : 3,
"beerName" : null,
"kindOfBeer" : null,
"score" : 11,
"numberOfDrinks" : null,
"image" : null,
"country" : null,
"description" : null,
"latitude" : null,
"longitude" : null
}
Now that we have those beers, we can search for score=10 or even score<10... this combined with boolean operators can create some really powerful query functionality.
% curl 'http://localhost:8888/_ah/api/birra/v1/searchBeer/score=10'
{
"items" : [ {
"id" : 1,
"beerName" : null,
"kindOfBeer" : null,
"score" : 10,
"numberOfDrinks" : null,
"image" : null,
"country" : null,
"description" : null,
"latitude" : null,
"longitude" : null
} ]
}
% curl 'http://localhost:8888/_ah/api/birra/v1/searchBeer/score>10'
{
"items" : [ {
"id" : 3,
"beerName" : null,
"kindOfBeer" : null,
"score" : 11,
"numberOfDrinks" : null,
"image" : null,
"country" : null,
"description" : null,
"latitude" : null,
"longitude" : null
} ]
}
Now, let’s look at the client
Searching from the Client
“ Yep: simplicity is the ultimate sophistication”
In our web app we can have the power of search with few lines of JavaScript. Let’s have a look at the code below. You can see that we are listening to an event of a ‘keydown’ so when the user click on ‘enter’ we wish to start the search. Then, all we need is to take the ‘term’ and pass it to:
gapi.client.birra.beer.search( { 'term' : searchTerm});
//
// Search after (good) beers
//
$( "#searchBeer" ).keydown( function (event) {
if (event.which == 13 ) {
var searchTerm = $( "#searchBeer" ).val();
$( '#results' ).html(beerApp.callingServerHtml);
var req = gapi.client.birra.beer.search( { 'term' : searchTerm});
req.execute( function (searchOutput) {
beerApp.showList(searchOutput);
});
}
});
On the results we will get a list of items that match your query. You can do some clever things like, geo query of beers around your current location:
latitude < curLoc.lat + 0.5 &&
latitude > curLoc.lat - 0.5 &&
longitude < curLoc.long + 0.5 &&
longitude > curLoc.long - 0.5
Security
The last area to cover is security. We want to ensure that only authenticated users can post comments. So first we add a client ID from the Google APIs Console . This will be shared with the JavaScript client. Then we specify the OAuth scope we need, in this case the email scope. Finally Endpoints injects the user object with the currently logged on user.
@ApiMethod ( name = "beers.comments.insert" ,
path = "beers/{beerId}/comments" ,
clientIds = { "AIzaSyAlZqy1ElhVN_Hbutey0xNabhZ14bEpcAo" } ,
scopes = { "https://www.googleapis.com/auth/userinfo.email" })
public Comment insertComment ( @Named ( "beerId" ) Long beerId, Comment comment, User user ) throws Exception {
if ( user == null ) throw new UnauthorizedException ( "Must log in" ) ;
comment.setUser(user);
Trying thing from the command line generates the exception as expected.
% curl -H 'Content-Type: application/json' -d '{"beerId": "1", "comment": "nice head"}' http://localhost:8888/_ah/api/birra/v1/beers/1/comments
{
"error" : {
"message" : "Must log in"
}
}
But from API Explorer, once we login, we get the right user info.
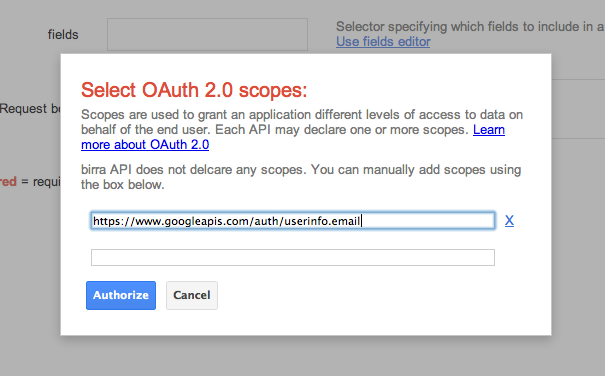
First we have to authenticate...
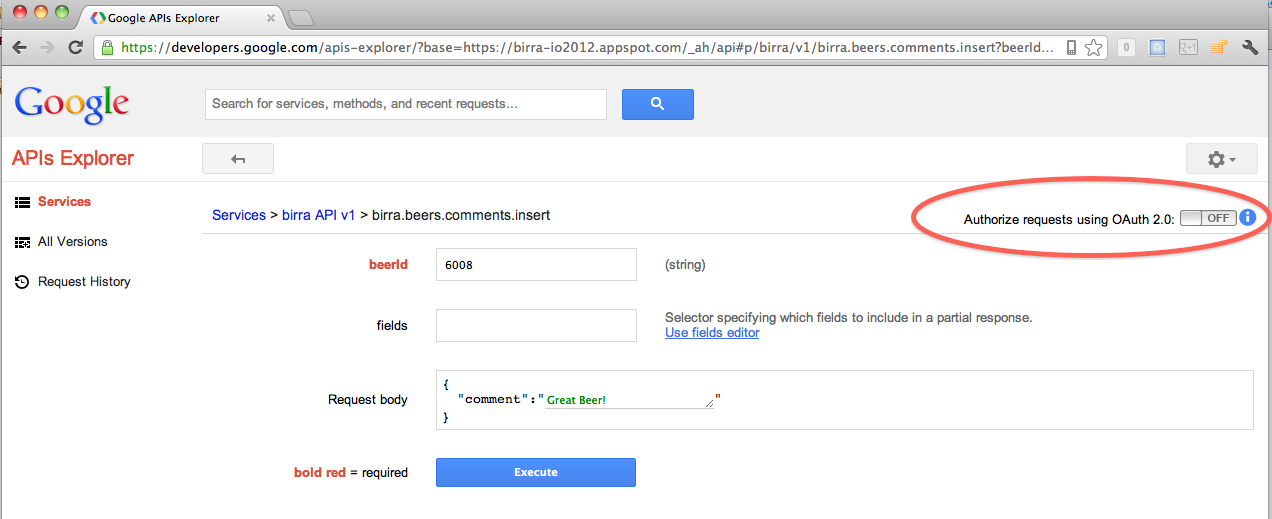
We give the OAuth scope from our @Api annotation...
And we get the results. Notice my email address is filled in correctly.
Authentication from the client
The basic flow of OAuth 2.0 in the JavaScript client is as follows:
- User clicks a "login" link.
- Browser shows a popup that allows the user to authenticate and authorize your web app.
- After successful authorization, the browser redirects the user back to the calling app (your app).
- The callback saves the authorization token and closes the popup. The user is now authorized to use your app!
// called at the initialization of our web app
function handleClientLoad() {
gapi.client.setApiKey(apiKey);
window.setTimeout(checkAuth,1);
}
// called to check if we are authorized with a specific permission that defined in ‘scope’. In our example we wish to get the user’s email so it will serve us when she adding a new comment.
function checkAuth() {
gapi.auth.authorize({client_id: clientId,
scope: scopes, immediate: true}, handleAuthResult);
}
// Handling the actions on cases where the user is already ‘logged in’ and approve us to ‘know’ their email. In that case, there is no point to add them to ‘authorize’ the app.
function handleAuthResult(authResult) {
var authorizeButton = document.getElementById('authorize-button');
if (authResult) {
authorizeButton.style.visibility = 'hidden';
insertComment();
} else {
authorizeButton.style.visibility = '';
authorizeButton.onclick = handleAuthClick;
}
}
// Handle the action when the user wish to start the ‘OAuth dance’. This will call the user account and open a pop-up window that will show the user what app is requesting which permissions. From here is they ‘agree’ we will get the ability to add comments with their email.
function handleAuthClick(event) {
gapi.auth.authorize({client_id: clientId,
scope: scopes, immediate: false}, handleAuthResult);
return false;
}
Here is an example of a comment that we are adding without permissions to get the user’s email:
{
"commentId": 23002 ,
"user": null ,
"date": null ,
"beerId": 6008 ,
"comment": "I want a drink" ,
"etag": "\"fQ6sM7LCuUUYcU5LIaq0IrnKECo/W6k8nbDP-T9StSHXQg5D9u2ieE8\""
}
When we have permissions it will look like:
commentId: 37001
user: [object Object]
(Jul 4 2012 1:9PM)
comment: Good one!
user email: your-email@google.com
Production Deployment
Now we are ready to deploy to production. We select the deploy to app engine
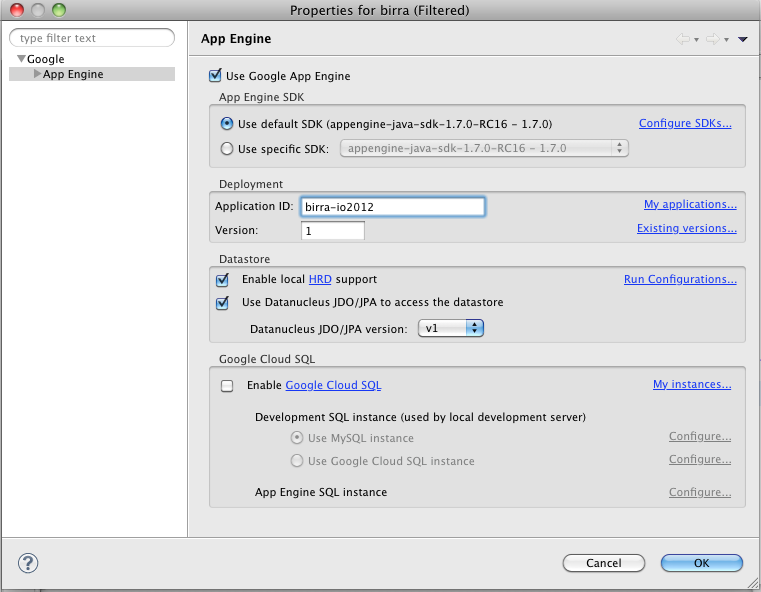
Then give it an appid (created from http://appengine.google.com )
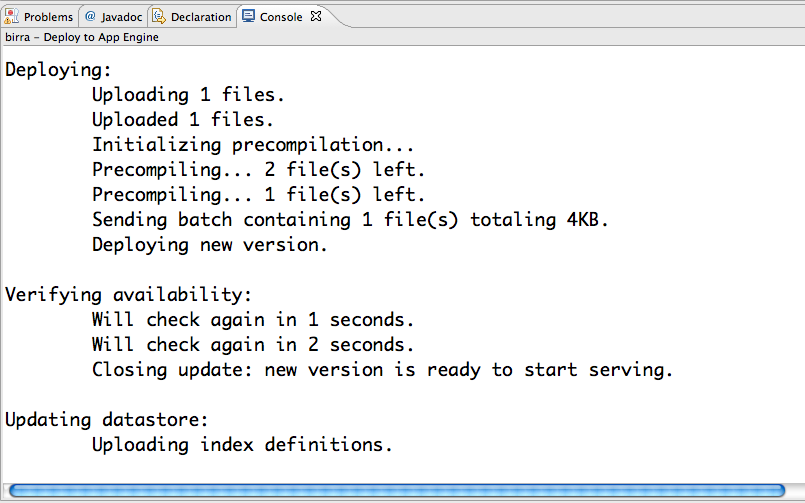
Total deployment time took about 1 min.
Now we test the app out - http://birra-io2012.appspot.com/
And now, we are ready to do some load testing... As a quick and dirty technique, I used ab (apache bench) to spin up several concurrent requests. The load time is actually very interesting. From a hardwired connection here at the conference I am getting some good results.
% ab -n9000 -c100 http://birra-io2012.appspot.com/
Percentage of the requests served within a certain time (ms)
50% 57
66% 57
75% 57
80% 58
90% 58
95% 59
98% 65
99% 441
100% 590 (longest request)
That means 98% of the requests are returning within 65 ms... that is very fast! Mostly because we are hitting google’s distributed output caching that you get as part of app engine.
After a few machines doing this sort of load testing, I was able to drive up the queries per second to about 6,000 queries per second. That is 360,000 r equests every minute or 518,400,000 requests a day!... which is a lot of unique users!
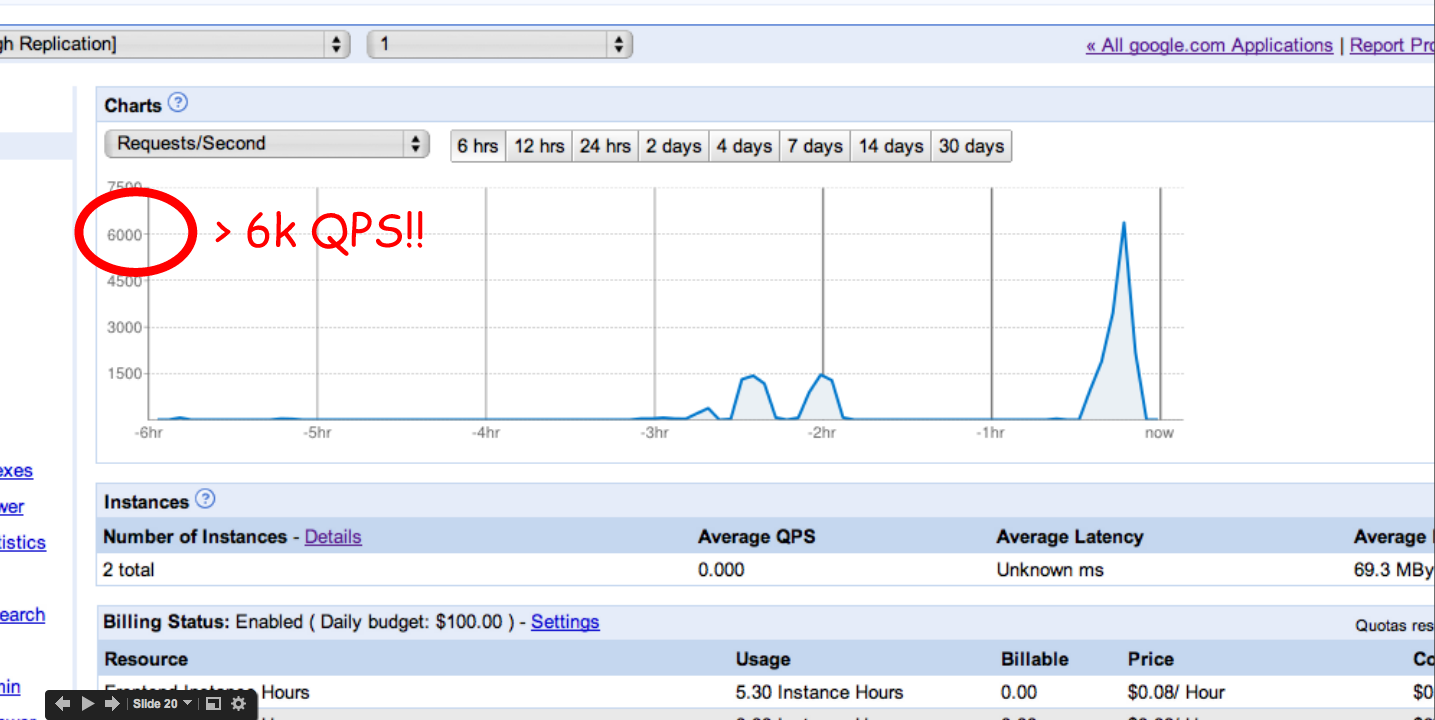
Nice, ahh?
In case you miss the first part of this series
More Resources:
- A robust and opinionated client-side stack - http://yeoman.io/
- backbone.js
- Google App Engine
- Google API Exploer
As always, if you have any comments please share...
comments powered by Disqus